
Your GM vehicle’s OnStar system is your lifeline during emergencies and your go-to for remote diagnostics and security. But all that depends on one critical piece: the Vehicle Communication Interface Module (VCIM). When this little black box fails, you’re suddenly cut off from automatic crash alerts, stolen vehicle tracking, and other key services.
Lately, many GM drivers—especially those behind the wheel of vehicles from around 2007 to 2014—are discovering their OnStar services going dark. The reason? The nationwide shutdown of older 2G and 3G cellular networks in 2022.
Without a module upgrade to handle 4G LTE, you’re left disconnected. Even if network changes aren’t your issue, damage from water leaks or internal malfunctions can still leave you in the same boat.
This guide clears up the confusion. Whether you drive a Silverado, Terrain, Escalade, or Volt, you’ll learn how to recognize a failing OnStar module, decide between tackling the replacement yourself or going to a dealership, and—most importantly—get your connectivity back.
1. What is the OnStar Module and How Does It Work?
The Brain Behind OnStar Services
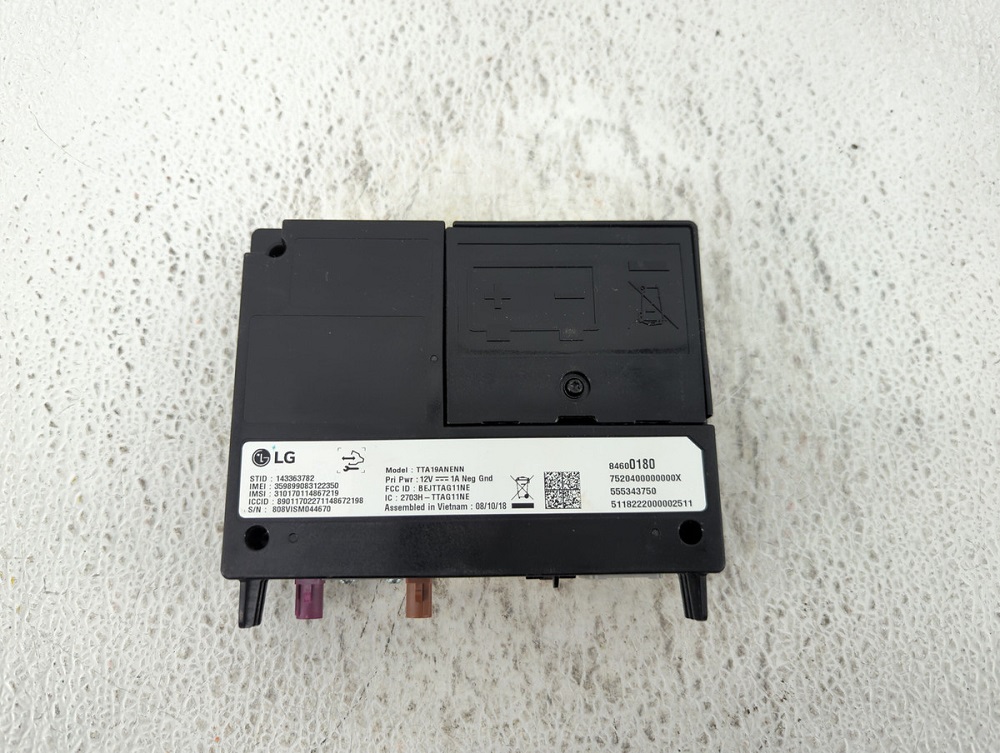
The OnStar module, formally known as the Vehicle Communication Interface Module (VCIM), serves as the nerve center that links your vehicle to OnStar’s network.
It’s a compact, self-contained unit equipped with a cellular modem for network connectivity, a GPS receiver for location tracking, and internal processors to manage communication between your vehicle and OnStar’s service center.
When you press the Blue Button on your rearview mirror or infotainment system, the module initiates a secure connection with OnStar’s network.
Beyond just enabling calls, the module handles critical features like automatic crash response, remote door unlock, stolen vehicle assistance, and hands-free calling in certain models.
If your airbag deploys, the module instantly alerts emergency services and shares your exact location. It can also assist law enforcement in tracking a stolen vehicle and, in some models, disable the engine to prevent further movement.
The module supports remote access features through GM’s mobile apps, allowing you to lock or unlock doors and even start the engine from anywhere.
For vehicles with OnStar-based navigation, it manages turn-by-turn navigation and real-time route updates. In models equipped with Bluetooth, the module is responsible for managing hands-free calling and audio pairing.
Where It Fits in Your Vehicle’s Ecosystem
The OnStar module integrates deeply into your vehicle’s electronic architecture. It connects to the CAN bus or Class 2 data bus, allowing seamless communication with other control modules. It also interfaces with the vehicle’s external antenna, typically mounted on the roof, to receive cellular and GPS signals.
In many GM vehicles, the module does more than provide OnStar services. It controls compass calibration, Bluetooth connectivity, and in some cases, infotainment and radio functions.
A failing module can cause a wide range of issues, from losing Bluetooth pairing and compass data to disabling voice commands and GPS updates.
Typical Module Locations by Model
The physical location of the OnStar module varies depending on the vehicle. In Chevy Silverado and GMC Sierra models (2007–2014), it’s tucked behind the center dash near the radio.
In older Malibu models (2008–2012), you’ll find it behind the glovebox, while in newer Malibus (2016 and up), it’s mounted in the overhead console.
Equinox and Terrain models from 2010 to 2017 typically house the module in the center dash or rear cargo area, whereas the Chevy Volt (2011–2015) stores it near the trunk or side panel, close to the battery.
Because the module is so intertwined with critical vehicle systems, failure or network obsolescence can disrupt essential services. Knowing how the module works and where it’s located makes troubleshooting or replacing it easier when the time comes.
2. Why OnStar Modules Need Replacement
2G/3G Network Shutdown – Leaving Older Modules Useless
Many older GM vehicles, particularly models produced between 2007 and 2014, relied on 2G and 3G cellular technology for OnStar connectivity.
As U.S. cellular providers phased out these networks, most notably AT&T and Verizon ending 3G service in 2022, these modules became incapable of maintaining a connection with OnStar’s servers.
If your vehicle falls into this range and still has its original module, OnStar services such as automatic crash response, stolen vehicle assistance, and remote access are no longer operational. For these vehicles, upgrading to a 4G LTE-compatible module is the only way to restore service.
Water Damage and Physical Wear
OnStar modules are often installed in areas prone to moisture exposure, such as behind the dashboard, in the glovebox, or near the rear cargo area.
Water intrusion from a leaking sunroof, damaged antenna seal, or faulty drainage system can cause the module’s circuit board to corrode, leading to communication failures or permanent damage.
Corrosion or rust on the connectors can disrupt power and data signals, rendering the module inoperable. This type of damage typically requires full module replacement, as moisture can destroy the sensitive electronics inside.
Connectivity Failures and Internal Malfunctions
Like any electronic component, the OnStar module can develop internal faults over time. One of the most common symptoms is parasitic battery drain, where the module fails to enter sleep mode and continues drawing power after the vehicle is turned off.
A failing module may also trigger repeated fuse blowouts or error codes such as U0198 (Lost Communication with Telematics Control Module) or U0184 (Lost Communication with Radio Control Module). These faults often result in intermittent service interruptions, where OnStar functions randomly stop working or produce error messages.
Upgrading to Add New Features
Some GM owners proactively replace their OnStar module to unlock additional features that weren’t available with the original unit. A prime example is adding Bluetooth hands-free calling to models like the 2011 Chevy Silverado or 2014 Chevy Equinox by installing a compatible module with Bluetooth functionality.
Upgrading to a newer module can also add 4G LTE Wi-Fi hotspot capability in models where this feature was not originally supported. In cases where the module supports features beyond the vehicle’s factory configuration, a dealership may need to reprogram the vehicle to recognize the upgraded hardware.
These reasons make replacing the OnStar module a necessity for maintaining key safety and convenience features, ensuring your GM vehicle stays connected and operational.
3. Signs Your OnStar Module is Failing
Red or Off OnStar Status Light
The easiest way to spot a failing OnStar module is by checking the status light on your rearview mirror or overhead console. A steady green light indicates that everything is functioning correctly. However, if the light turns red or doesn’t illuminate at all, it’s a clear indication that the system has encountered a fault.
A red status light suggests a module error, while no light typically means the module isn’t receiving power or is unable to establish a connection with OnStar’s servers. This issue is common after a 2G/3G network shutdown or when internal hardware malfunctions.
Error Messages and Unresponsive OnStar Button
When you press the OnStar Blue Button and receive no response or encounter messages like “OnStar Not Available”, it often points to a module that has stopped communicating with the vehicle.
In some cases, the system may repeatedly attempt to connect without success, leaving the user with a dead button that fails to establish a connection. If your subscription is active, but OnStar no longer responds, the module is likely failing or has become obsolete due to cellular network discontinuation.
Loss of Bluetooth, Compass, or Navigation
In many GM models, the OnStar module also controls ancillary features like Bluetooth hands-free calling, digital compass calibration, and turn-by-turn navigation downloads. When the module malfunctions, these features may stop working or become unreliable.
For instance, Bluetooth pairing may drop unexpectedly, or the compass may fail to calibrate after driving several miles. Similarly, turn-by-turn navigation, which relies on OnStar’s data, may cease functioning, leaving the driver without navigation assistance.
Parasitic Battery Drain and System Malfunctions
A failing OnStar module can cause the vehicle’s system to remain active when it should enter sleep mode, leading to excessive battery drain. This problem is particularly noticeable if the vehicle’s battery dies within a day or two of sitting idle.
Additionally, error codes like U0198 (Lost Communication with Telematics Control Module) or U0184 (Lost Communication with Radio Control Module) may appear when scanning the vehicle’s system with a diagnostic tool.
These codes indicate that the module is no longer properly communicating with other vehicle systems, a clear sign that it needs replacement.
Ignoring these warning signs can lead to continued service interruptions, system malfunctions, and increased risk in emergency situations where OnStar’s assistance could be critical.
4. Dealership Replacement vs. DIY: Which Option is Better?
Dealership Replacement – Pros and Cons
Replacing the OnStar module at a dealership is the most straightforward option. Since dealerships have the right tools and expertise, they can quickly program and activate the new module without any guesswork.
They’ll ensure the module matches your vehicle’s VIN and that all services, including remote diagnostics, Bluetooth, and Wi-Fi (if applicable), are properly reactivated.
The biggest advantages here are convenience and reliability. You drop off the vehicle, and they handle the rest. The new module will be programmed using GM’s Tech2 or MDI/GDS2 tools, ensuring compatibility with your vehicle’s network. Another perk is that the work is often covered under warranty if your vehicle qualifies, eliminating the cost of parts and labor.
However, the downside is the cost. Dealership module replacements can be expensive, with total costs ranging from $700 to over $1,000, depending on the vehicle and module type.
Labor charges, programming fees, and dealership markups contribute to these high costs. Additionally, if the module is on backorder, you could be left waiting for weeks or even months.
DIY Replacement – Pros and Cons
For the more adventurous or budget-conscious, a DIY replacement is a viable alternative. Many GM owners opt to replace the module themselves, especially when they can source a used or surplus module for $30 to $100.
Salvage modules are often available on platforms like eBay or car parts marketplaces. New surplus modules from online retailers typically cost between $80 and $200, making DIY replacement significantly more affordable than a dealership visit.
Physically swapping the module is usually straightforward, requiring basic automotive tools such as trim removal tools, screwdrivers, and sockets.
Depending on the model, the module may be located behind the dashboard, in the glove box, or near the rear cargo area. The challenge lies in programming and activation.
While the physical installation is easy for most DIYers, reprogramming the module with your vehicle’s VIN and activating OnStar services can be tricky.
Without proper programming, a replacement module may not function fully. While some features, like Bluetooth and the compass, may work without programming, OnStar services won’t activate until the new module is linked to your account.
If you go this route, you’ll need to call OnStar and request a hardware replacement reactivation. The process can be hit or miss, and some users report needing multiple calls or escalation to higher-tier support.
Weighing the Options
If you prefer peace of mind and a hassle-free experience, the dealership route is the safer bet, especially if the vehicle is under warranty or you’re unfamiliar with vehicle electronics.
However, if you’re comfortable with basic automotive tasks and willing to invest time in ensuring proper activation, a DIY replacement can save you hundreds of dollars.
Consider the condition of your vehicle, your budget, and your willingness to deal with potential troubleshooting when choosing between these two options.
If you’re confident in your ability to follow detailed steps and navigate the activation process, DIY replacement can be a rewarding and cost-effective solution.
5. Step-by-Step Guide to DIY OnStar Module Replacement
Tools and Parts You’ll Need
Before getting started, gather the necessary tools and parts to avoid delays during installation. You’ll need:
• Compatible OnStar module – Ensure the replacement module matches your vehicle’s make, model, and year. Salvage modules are usually inexpensive, but be cautious when purchasing used modules that may have VIN mismatch issues.
• Trim removal tools and screwdrivers – For removing panels or dash covers that protect the module.
• Socket set – Typically 7mm or 10mm sockets for removing bolts securing the module.
• Electrical contact cleaner (optional) – To clean connectors if there’s corrosion or debris.
Step 1: Disconnect the Battery
To prevent electrical shorts or triggering error codes, always disconnect the negative battery terminal before working on any electrical components. This step is critical, especially when replacing modules that interface with the vehicle’s data network.
Step 2: Locate the OnStar Module
The location of the module varies depending on the vehicle model and year. Here are a few common locations:
• Silverado, Sierra, Tahoe, Escalade (2007–2014): Behind the radio or center dash.
• Malibu (2008–2012): Behind the glove box or near the firewall.
• Equinox, Terrain (2010–2017): Center dash or rear cargo side panel.
• Volt (2011–2015): In the trunk, near the battery or side panel.
If you’re unsure of the location, refer to your vehicle’s service manual or search for model-specific instructions.
Step 3: Remove Interior Panels and Access the Module
Once you’ve identified the module’s location, carefully remove any trim panels, glove boxes, or dash covers to gain access. Use trim removal tools to avoid damaging the plastic clips that secure these panels. If the module is behind the radio, you may need to remove the infotainment unit before reaching it.
Step 4: Unplug and Remove the Old Module
The OnStar module is secured with a few screws and connected to the vehicle’s wiring harness and antenna. Unplug the connectors carefully, making sure not to damage any pins. Disconnect any coaxial antenna cables and remove the screws holding the module in place.
Step 5: Install the Replacement Module
Position the new module in place and secure it with the same screws. Reattach the wiring harness and antenna cables, ensuring a snug and secure connection. Double-check that all connectors are seated properly, as loose connections can cause intermittent issues.
Step 6: Reconnect the Battery and Power Up
Reconnect the negative battery terminal and turn the ignition to the “On” position. This powers up the module and prepares it for activation. At this stage, the module is physically installed, but it still needs to be programmed or activated to function fully.
Step 7: Programming and Activation
This is where things can get tricky. A newly installed module will not automatically sync with your vehicle’s VIN. While some functions, like Bluetooth and the compass, may work immediately, OnStar services will not activate until the module is properly linked to your account.
Option 1: Dealership Programming
If you prefer a hassle-free approach, take the vehicle to a dealership for module programming. They will use GM’s Tech2 or MDI/GDS2 tool to write your vehicle’s VIN to the new module and ensure all features are enabled. This process guarantees compatibility and restores full functionality, but it comes at an additional cost.
Option 2: DIY Activation via OnStar
If you want to avoid dealer fees, press the OnStar button after installing the module. You’ll connect with an OnStar advisor who can attempt to reprogram the system remotely.
Explain that you’ve replaced the module and need a hardware replacement reactivation. The advisor may ask for your account details and vehicle information.
If the initial attempt doesn’t work, ask to escalate the case to a higher-level technical advisor who can manually update the system. Activation may take a few minutes or, in some cases, up to an hour.
Step 8: Test the System
After activation, test all OnStar features to confirm that everything works. Press the blue OnStar button to verify connectivity. Check Bluetooth pairing, compass calibration, and any other features routed through the module. If any errors appear, perform a system reset by turning the vehicle off and on again.
6. Programming and Activation: How to Get the New Module Working
Why Programming is Essential
Swapping in a new OnStar module isn’t as simple as plugging it in and calling it a day. The module needs to be programmed with your vehicle’s VIN to establish communication with other control modules and ensure seamless integration. Without this step, OnStar services won’t function, and you may encounter error messages or system malfunctions.
Dealer Programming and VIN Matching
The easiest and most reliable way to program a replacement module is through a GM dealership or an authorized service center. Dealership technicians use Tech2, MDI, or GDS2 diagnostic tools to program the module and link it to your vehicle’s VIN. The process involves:
• VIN Assignment: The technician writes your vehicle’s VIN to the module, ensuring compatibility with your car’s network.
• OnStar Setup and Activation: Once the module is linked, the system undergoes a final setup to activate OnStar services.
• Verification and Testing: The dealership verifies that the module communicates correctly and performs a test call to OnStar.
Most dealerships include this programming service in the installation fee, but if you’ve already installed the module yourself, expect to pay around $100 to $150 for VIN reprogramming.
DIY Activation via OnStar
If you prefer to skip the dealership and attempt activation yourself, you can try the OnStar hardware replacement reactivation method. This approach works best if the replacement module is the same generation and from a compatible model. Follow these steps:
1. Press the Blue OnStar Button: After installing the new module, press the button and wait for an advisor to respond.
2. Explain the Hardware Replacement: Tell the advisor that you’ve replaced the OnStar module and need to activate it. Be clear that it’s a hardware change, which may require re-linking to your account.
3. Provide Account and Vehicle Information: The advisor may ask for your VIN and account details to identify your vehicle in the system. They’ll attempt to initiate a hardware ID update to link the new module to your account.
4. Wait for Activation: Activation can take anywhere from a few minutes to an hour. In some cases, the advisor may escalate the case to a technical support team if the initial activation doesn’t go through.
Troubleshooting Common Activation Issues
If the initial activation attempt fails, don’t panic. Many DIY installers experience hiccups when reactivating OnStar after a module replacement. Here’s how to handle common problems:
• VIN Mismatch Error: This occurs when the module’s stored VIN doesn’t match your vehicle. OnStar advisors can often correct this by manually updating the hardware ID in their system.
• Module Not Recognized: If the system doesn’t detect the new module, check the connections and ensure that the module is properly seated. Restarting the vehicle may also help establish communication.
• Failure to Connect to OnStar: If the module cannot connect to OnStar’s network, double-check that the module is compatible with your vehicle and that it supports the correct cellular network.
Pre-Programmed Modules for Plug-and-Play
If you want to avoid the hassle of programming or activation, consider purchasing a pre-programmed module from a reputable vendor. Companies like White Automotive & Media Services (WAMS) offer pre-flashed modules that come ready to plug in, with your VIN and desired features already configured. This eliminates the need for dealer programming and simplifies the installation process.
What Happens After Activation
Once the module is successfully activated, the OnStar status light should return to a steady green. You’ll regain access to core services, including:
• Automatic Crash Response: OnStar can detect a collision and automatically notify emergency responders.
• Remote Door Unlock and Engine Disable: You can use the OnStar app or contact an advisor to lock, unlock, or disable the vehicle remotely.
• Vehicle Diagnostics and Security Alerts: OnStar monitors your vehicle’s health and notifies you of potential issues.
If Bluetooth, compass, or navigation features were routed through the old module, these should now function correctly with the new one. Test all features after activation to confirm everything is working as expected.
7. OnStar Module Compatibility Chart by Model Year and Network Version
Why Compatibility Matters
Not all OnStar modules are interchangeable, even if they look similar and have matching connectors. Modules differ by generation, cellular network compatibility, and feature set. Installing an incompatible module can lead to the loss of services or partial functionality.
The key to avoiding headaches is ensuring that the replacement module matches your vehicle’s original specifications or is a known, compatible upgrade.
Generational Differences in OnStar Modules
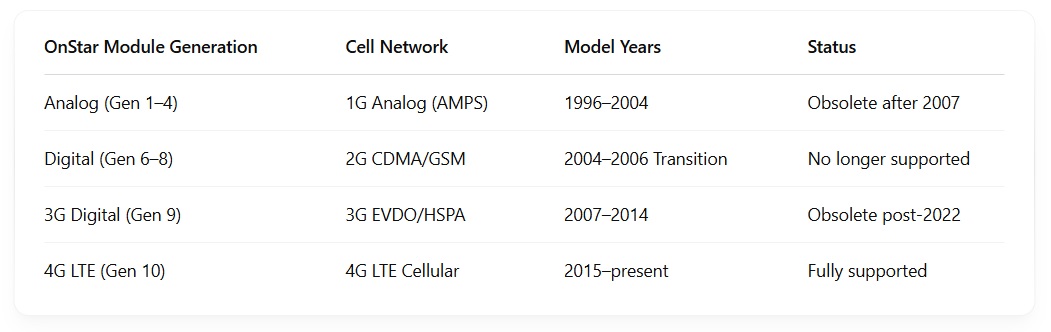
OnStar modules have evolved significantly over the years, primarily due to advances in cellular technology. Earlier models relied on analog or 2G networks, which have since been phased out.
Modules used from 2007 to 2014 relied on 3G networks, which were also discontinued in 2022. The most recent generation supports 4G LTE, ensuring continued compatibility and access to OnStar’s services.
Here’s a breakdown of OnStar module generations, the cellular technology used, and their status today:
Identifying Your Module’s Generation
To determine which OnStar module is in your vehicle, you’ll need the part number or GM RPO (Regular Production Option) code.
The module’s part number is typically found on a label attached to the unit itself. If you prefer not to remove the module, you can contact a GM dealer with your VIN and ask them to look up the module’s details.
• RPO Code UE1: This code indicates that your vehicle is equipped with an OnStar system.
• RPO Code UPF: If your module supports Bluetooth hands-free calling, it will have this additional code.
• Module Part Number: Common part numbers for Gen 9 modules include 22738767 and 25984444, while Gen 10 (4G LTE) modules use numbers like 23470272 or 84293872.
Compatibility by Model and Year
Compatibility varies by model, and some vehicles offer a straightforward upgrade path. Below is a summary of common GM vehicles and the corresponding OnStar module versions:
Chevrolet Silverado and GMC Sierra (2007–2014)
These trucks originally used Gen 9 (3G) modules. Upgrading to a Gen 10 (4G LTE) module is possible but requires VIN programming and activation. Owners upgrading their 2014 Silverado or Sierra with part number 84293872 reported restored OnStar functionality with LTE services.
Chevy Equinox and GMC Terrain (2010–2017)
Most models from this generation use 3G Gen 9 modules. Replacing with a 4G LTE-compatible module from a later Equinox or Terrain (2018–2021) can restore OnStar services after the 3G shutdown.
Cadillac Escalade (2007–2014)
Escalades in this period used 3G modules similar to the Silverado and Tahoe. Upgrading to a 4G LTE module like part number 84293872 restores connectivity and adds features like Wi-Fi hotspot capability.
Chevy Volt (2011–2015)
The first-generation Volt relied on a 3G module, making it vulnerable to the network sunset. Owners have reported success swapping in later-model 4G LTE modules to restore Bluetooth and other features, though OnStar services may require additional reprogramming.
Chevy Malibu (2008–2012, 2016–2021)
Malibu models from 2008–2012 used Gen 9 modules. Later generations (2016 and up) came standard with 4G LTE, making module replacement straightforward for vehicles from 2016 onward.

Limitations and Compatibility Challenges
While some vehicles offer easy upgrade paths, others do not. GM did not provide official retrofit options for all models, and compatibility is not guaranteed across platforms.
• VIN Programming Required: Even if the module is physically compatible, it needs to be reprogrammed with your vehicle’s VIN for full functionality.
• Loss of Features: Using an incompatible module can lead to partial loss of features such as Bluetooth, compass calibration, or hands-free calling.
Best Practices for Finding a Compatible Module
When shopping for a replacement module:
• Match the Part Number: Stick with the exact part number or a known compatible alternative to avoid compatibility issues.
• Check Network Compatibility: Ensure the module supports 4G LTE if you’re replacing an obsolete 3G unit.
• Confirm RPO Codes: Double-check that the replacement module supports all the features your vehicle originally had.
If you’re unsure about compatibility or need help verifying part numbers, a GM dealer or reputable online vendor can provide guidance.
8. Cost Breakdown: Dealer vs. DIY Replacement Costs
What Affects the Cost of Replacing an OnStar Module?
The total cost of replacing an OnStar module depends on whether you go through a dealership or take the DIY route. Key factors include:
• Module Cost: New modules from GM or authorized suppliers are more expensive than used or surplus modules. Prices vary based on generation (3G or 4G LTE) and vehicle compatibility.
• Labor and Programming: Dealerships include labor and VIN programming in their pricing, while DIY replacement requires purchasing the module separately and possibly hiring a third party for programming.
• Module Type: New modules are more expensive than used ones. Used modules can save money but may require reprogramming or activation.
Dealer Replacement Costs: What to Expect
Replacing the OnStar module through a dealership guarantees proper installation and programming, but it comes with a higher price.
• New Module Pricing: OEM OnStar modules typically range from $200 to $500+ depending on the model and year. A 2013 Chevy Equinox module (part number 22764232) is listed at $247 from GM, while a 2018 Silverado module (84293872) can cost over $400 at dealer rates.
• Labor Costs: Dealership labor for replacing and programming the module adds an additional $150 to $300. The exact cost depends on your location and dealership labor rates, which average $100 to $150 per hour.
• Programming and Activation Fees: VIN programming and OnStar activation are usually included in the labor fee, but some dealerships may charge a separate $50 to $150 for programming alone.
Typical Dealer Cost Breakdown
Here’s a typical dealer replacement scenario:
• Module Part: $300
• Labor/Installation: $200
• Programming Fee: Included
• Total Cost: $500 to $1,000+
DIY Replacement Costs: A More Affordable Option
DIY replacement is significantly cheaper, especially if you source a used module and handle the installation yourself.
• Used Module Pricing: Salvage or used OnStar modules typically range from $30 to $100 depending on the model. A used 2018 Silverado module was listed at $75 from a reputable recycler, while a 2012 Chevy Volt module was found for under $40 on eBay.
• New Surplus or Refurbished Modules: New surplus or refurbished modules are available for $80 to $200, depending on the model and part number. These modules offer a middle ground between used and dealer-sourced modules.
• Programming Costs (If Required): While DIYers can install the module, programming may require a dealer or third-party service. Programming costs range from $50 to $150, depending on the complexity and model. Some third-party services, such as White Automotive & Media Services (WAMS), offer pre-programming for about $125.
Typical DIY Cost Breakdown
Here’s a typical DIY replacement scenario:
• Used Module: $50
• Self-Installation: Free
• Programming (if required): $100
• Total Cost: $30 to $250+
Hidden Costs and Considerations
While DIY replacement saves money, it comes with additional risks and responsibilities.
• Wrong Module or VIN Mismatch: Installing an incompatible module may lead to partial functionality or activation failure. Correcting this error may require dealer assistance, adding unexpected costs.
• Time and Effort: DIY installation and activation can be time-consuming, especially if programming or activation issues arise.
• Warranty Impact: Replacing the module yourself may void warranty coverage if the vehicle is still under factory warranty.
Dealer vs. DIY: Which Option Makes Sense?
Choose the Dealer Route If:
• Your vehicle is still under warranty.
• You prefer the peace of mind that comes with professional installation and guaranteed programming.
• You’re not comfortable with automotive electronics or module programming.
Choose DIY If:
• You’re confident in your ability to replace and troubleshoot the module.
• The vehicle is out of warranty, and you’re looking to save on labor costs.
• You’re willing to spend time ensuring compatibility and completing the activation process.

9. Common Pitfalls and Post-Installation Considerations
VIN Mismatch and Activation Failures
One of the most common pitfalls after replacing an OnStar module is a mismatch between the vehicle’s VIN and the module’s stored information. Used modules often retain the donor vehicle’s VIN, which can prevent proper activation.
When OnStar attempts to activate the new module, their system may still associate it with the old vehicle, leading to connection errors or rejection of the activation request.
If the module was sourced from another vehicle, you’ll need to ensure that the module is properly reprogrammed or that OnStar updates the associated VIN in their system.
This process may require persistence, as first-line OnStar advisors may not always have the tools to resolve VIN mismatch issues. In cases where reprogramming or activation fails, a dealership visit may be necessary to reflash the module and sync it with your vehicle’s data.
Loss of Features Due to Incorrect Module
Swapping in a used or different-generation module may result in a loss of certain features. Not all OnStar modules are created equal—some support Bluetooth hands-free calling, while others lack this feature.
Similarly, modules from earlier generations may not support Wi-Fi hotspots or 4G LTE connectivity, limiting functionality in newer vehicles.
If you replace a module with one that lacks specific features or is incompatible with your vehicle’s systems, certain functionalities may disappear entirely.
For example, a used module pulled from a base trim vehicle may not support the Bluetooth option available in a higher trim. Always double-check part numbers and confirm that the replacement module supports the features you expect to retain.
Network Compatibility Issues
Vehicles equipped with older 2G or 3G modules may no longer connect to OnStar’s services after the network sunset in 2022. If you’re replacing a module in a vehicle that originally relied on these outdated networks, upgrading to a 4G LTE module is the only solution to restore connectivity.
However, not all GM models have compatible 4G module upgrades available, and GM did not officially offer 4G retrofits for most older vehicles.
If you attempt to install a module that operates on an obsolete network, OnStar services will remain offline regardless of proper installation. Make sure the replacement module supports the current network standard for your region.
Parasitic Battery Drain from Faulty Modules
A defective or malfunctioning OnStar module can cause excessive battery drain, especially if it fails to enter sleep mode. Some owners have reported dead batteries caused by modules that draw power continuously, even when the vehicle is turned off.
If you experience unexplained battery drain after replacing the module, consider disconnecting the module temporarily to see if the drain stops.
If the battery drain persists with the new module installed, it’s likely due to a software issue or a hardware malfunction. You may need to replace the module again or have it professionally reprogrammed to ensure that it enters sleep mode correctly.
Risk of Obsolete or Incompatible Modules
Using a module from a different vehicle model year or trim may introduce compatibility issues. While some modules may physically fit and function partially, they may not communicate properly with your vehicle’s network. This can result in intermittent functionality, error codes, or even the loss of key features.
Even when the module appears to be working, subtle compatibility issues may manifest over time. For example, some 2010–2014 GM models that originally used 3G modules cannot seamlessly accept 4G LTE modules without software updates or additional configuration.
If you’re attempting to upgrade or retrofit a module, verify compatibility with your vehicle’s electrical architecture and software version.
Activation and Account Setup Challenges
DIY replacements often encounter challenges during the activation process. Pressing the OnStar button after installing a new module initiates an activation call, but not all OnStar advisors are familiar with hardware changes.
It may take multiple attempts and escalation to higher-level technical support to reassign the new module’s hardware ID to your vehicle’s VIN.
If activation issues persist after multiple attempts, you may need to visit a dealership to have the module programmed correctly. Dealers have access to GM’s proprietary tools that can reconfigure the module and perform a “manual activation” process if needed.
Warranty and Legal Considerations
If your vehicle is still under factory warranty, replacing the OnStar module yourself may void coverage for telematics-related components. Improper installation or use of an incompatible module could potentially affect warranty coverage on electrical systems. Additionally, for leased vehicles, modifying or replacing telematics hardware may violate the terms of your lease agreement.
Before proceeding with DIY installation, weigh the potential warranty implications and check with your dealership to confirm that self-replacement won’t void any remaining warranty coverage.
Final Thoughts on Avoiding Pitfalls
To minimize post-installation headaches, double-check the compatibility of your replacement module, ensure the VIN is updated correctly, and be prepared for possible troubleshooting during activation.
Taking these precautions will help restore your OnStar services while avoiding common issues that plague DIY module replacements.
10. When It’s Better to Visit a Dealership
Covered Under Warranty or Eligible for Recall
If your vehicle is still under factory warranty or has an extended warranty that covers telematics or electronic components, it’s best to have the OnStar module replaced by a dealership.
Warranty coverage means you won’t have to worry about parts or labor costs, and the dealership will ensure that the module is correctly programmed and activated.
Additionally, some GM vehicles have had service bulletins or recalls related to telematics modules. For example, certain 2020–2022 models experienced communication failures requiring module replacement, and GM covered the repairs under recall or special service campaigns.
If your vehicle falls within these categories, visiting a dealership ensures that the module is replaced correctly and that your vehicle maintains full compliance with GM’s service guidelines.
Complex Newer Models with Integrated Systems
Newer GM vehicles, especially models from 2019 onward, often have more complex telematics systems that integrate tightly with the infotainment system, vehicle diagnostics, and communication protocols.
For instance, electric vehicles like the Chevy Bolt EV or luxury models like the Cadillac Escalade have more advanced control modules that may require proprietary software updates and system calibrations after module replacement.
In these cases, a DIY installation may not fully restore the system’s functionality, even if the physical replacement goes smoothly. Dealerships have the required tools, such as GM’s Tech2 or MDI/GDS2 interfaces, and access to the SPS (Service Programming System) to ensure proper configuration.
Attempting to replace a module in these vehicles without the right tools can lead to incomplete activation, error messages, or system malfunctions.
VIN Mismatch or Persistent Activation Failures
If you’ve installed a replacement module but are experiencing persistent activation failures or VIN mismatch issues that OnStar support cannot resolve remotely, visiting a dealership may be the only viable solution. A mismatched VIN can prevent OnStar from recognizing the new module, leaving the system non-functional.
While OnStar advisors can sometimes update the module’s hardware ID over the air, certain cases require manual reprogramming of the module to match your vehicle’s VIN.
This process is often beyond the capabilities of a DIY installation and requires dealership intervention. A dealership can directly write the correct VIN to the module, ensuring that it communicates properly with the vehicle and OnStar’s backend systems.
Failed DIY Attempts or Error Codes After Installation
If a DIY installation results in error codes, loss of features, or incomplete system functionality, it’s often best to have a dealership diagnose and resolve the issue.
Even if the physical installation was done correctly, improperly configured modules can cause data bus errors or prevent certain vehicle systems from working as expected.
For example, if the vehicle displays DTC U0198 (Lost Communication with Telematics Control Module) or DTC U0184 (Lost Communication with Radio Control Module) after installation, this often indicates a configuration error that requires professional reprogramming.
While some DIYers can clear codes using an OBD-II scanner, persistent errors or failure to restore OnStar functionality usually warrant a trip to the dealership.
Salvage Modules or Unmatched Part Numbers
When using a salvage or used module from another vehicle, it’s essential to verify that the part number matches your vehicle’s original module. Even modules that appear physically identical may have different firmware versions, leading to incompatibilities or missing features.
If you’re unsure whether a replacement module is fully compatible or if OnStar refuses to activate a used module due to a mismatch, a dealership visit can resolve these issues. They can flash the correct firmware, clear any stored VINs, and ensure that the replacement module integrates properly with your vehicle’s systems.
Software Updates and Module Compatibility
Certain module replacements require firmware updates or software patches that only dealerships can perform. For instance, when upgrading from a 3G to a 4G LTE module, some models require updates to the infotainment system or body control module to recognize the new hardware.
GM issued over-the-air updates for some models to maintain 4G connectivity after the 3G network sunset, but vehicles that missed these updates may require dealer intervention. Without these updates, even a correctly installed replacement module may not function properly.
When Safety and Security Are Critical
If you heavily rely on OnStar’s safety and security features, such as automatic crash notification, remote vehicle disable, or emergency assistance, any misstep during module replacement can compromise these critical functions.
A dealership-installed module ensures that these features remain intact and that OnStar’s emergency services operate as intended.
For drivers who prioritize peace of mind and vehicle safety, opting for a dealership replacement guarantees that the system is configured and tested correctly. Even minor configuration errors could lead to delays in emergency response or loss of essential services.
Legal and Lease Considerations
For leased vehicles, modifying or replacing factory-installed telematics hardware may violate the terms of your lease agreement. Leased vehicles often have strict guidelines regarding modifications, and tampering with the telematics module could create legal issues or financial penalties at the end of the lease term.
To avoid potential lease violations, it’s advisable to have the module replaced by an authorized dealership. This approach maintains compliance with lease agreements and ensures that the vehicle’s original configuration is restored.
Time and Convenience
Replacing and activating an OnStar module can be a time-consuming process, especially if activation errors or compatibility issues arise. For busy car owners who prefer a hassle-free experience, a dealership visit guarantees that the module is replaced, programmed, and tested correctly.
Dealerships typically complete module replacements within a few hours, and since they handle programming and activation, you can leave with a fully functional OnStar system. If convenience is a priority and you prefer avoiding the complexities of DIY troubleshooting, a dealership installation is the better option.
Final Thoughts: Restoring OnStar Services with Confidence
Replacing an OnStar module can feel daunting, especially when dealing with activation issues, compatibility concerns, or the risk of incomplete functionality.
Whether you’re upgrading from a 3G to a 4G LTE module, replacing a failed unit, or troubleshooting error codes, the key is ensuring that the replacement module is correctly installed, programmed, and activated.
If you’re confident in your ability to handle a DIY replacement, following the correct steps—such as verifying module compatibility, programming the VIN correctly, and working with OnStar support—can save time and money.
Many GM owners have successfully replaced modules themselves, restoring full telematics functionality without dealership intervention.
However, when dealing with complex systems, newer models with integrated telematics, or persistent activation problems, a dealership visit often provides the most reliable solution.
Dealership technicians have the tools, software, and expertise to ensure that the module is properly configured and that all related vehicle systems communicate seamlessly.