
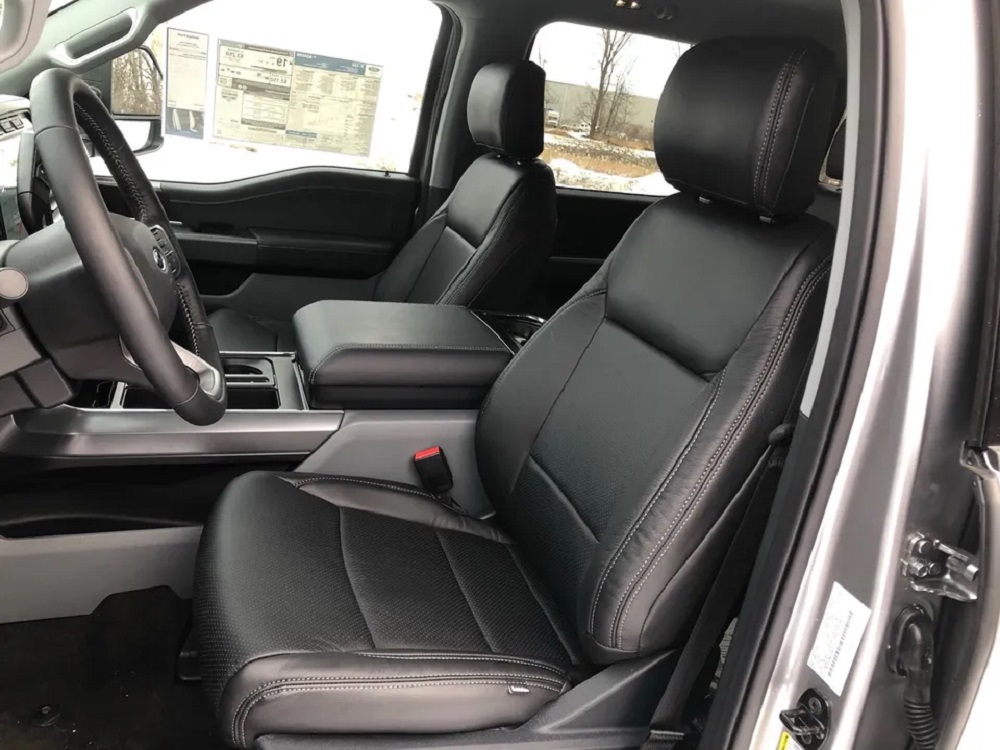
The center console in a Ford F-150 does more than just hold your coffee. It’s where tools, tech, and day-to-day gear live. Whether you’re hauling tools to a jobsite, heading out on a long road trip, or just commuting across town, that console quietly keeps everything within reach—and when it’s not working for you, you feel it.
That’s why so many owners eventually upgrade. Some want better storage. Others are after modern tech like wireless charging or a stowable shifter. And some just want to swap that plain jump seat for a full console that feels like it belongs in a premium trim.
From simple drop-in trays to full-on bench-to-bucket seat conversions, the upgrade options are wide open—and so are the price tags. Some mods cost less than lunch. Others will run you thousands. Knowing which path fits your truck (and your budget) is where this guide comes in.
We’re breaking it all down: which upgrades fit which model years, what installation actually involves, what owners are saying online, and how to avoid costly mistakes.
1. Know Your Truck Before You Buy Anything
Before you even think about which console upgrade looks best or offers the most storage, take a closer look at what you’re working with. Not all F‑150s are created equal, and a mismatch here can turn your upgrade into a headache.
Start with the Generation and Trim
The first thing to figure out is your truck’s generation. A 2010 F‑150 isn’t going to have the same console layout or mounting points as a 2023 model.
Ford’s lineup has changed dramatically from the 12th generation (2009–2014), to the aluminum-bodied 13th (2015–2020), the tech-heavy 14th (2021–early 2024), and now the evolving 15th generation starting mid-2024. Interior layout, wiring, and even the shape of the console base differ between each.
Trim level matters too. A base XL might come with a fold-down armrest and no floor console at all, while a Lariat or Platinum could have a full flow-through setup with built-in USB hubs, cubbies, and even a work surface.
Swapping between trims usually isn’t plug-and-play—especially if your target upgrade includes electronic ports or integrated shifters.
Seat Setup and Shifter Location Change Everything
Now take a good look at your front seat configuration. If your truck has a 40/20/40 split bench, you’ll run into compatibility issues trying to install a full-length console designed for bucket seats. The upgrade won’t sit right unless you swap out the center seat and sometimes even both side seats.
Shifter placement is another deciding factor. Column-mounted shifters—typically found in work trucks—leave more room down low but don’t line up well with full-length consoles. Floor shifters, usually part of the flow-through console, have different brackets and wiring to consider.
And if your eyes are on the stowable shifter design introduced in 2021, just know it’s not a casual install—it’s paired with a retractable mechanism and electronic controls that may require dealer programming to function properly.
Use Factory Stickers and the VIN to Confirm Everything
To avoid guesswork, check the label inside your driver’s door. It gives you your build date and interior code, which tells you exactly how your truck was optioned. Then take your VIN—usually visible at the base of the windshield—and plug it into Ford’s official parts site or a decoder tool online.
You’ll get a complete readout of your configuration: seating, trim level, shifter type, and more. This is your best shot at confirming that the console you’re eyeing will actually bolt in and match your wiring.
2. What You Can Upgrade—and What Each One Fixes
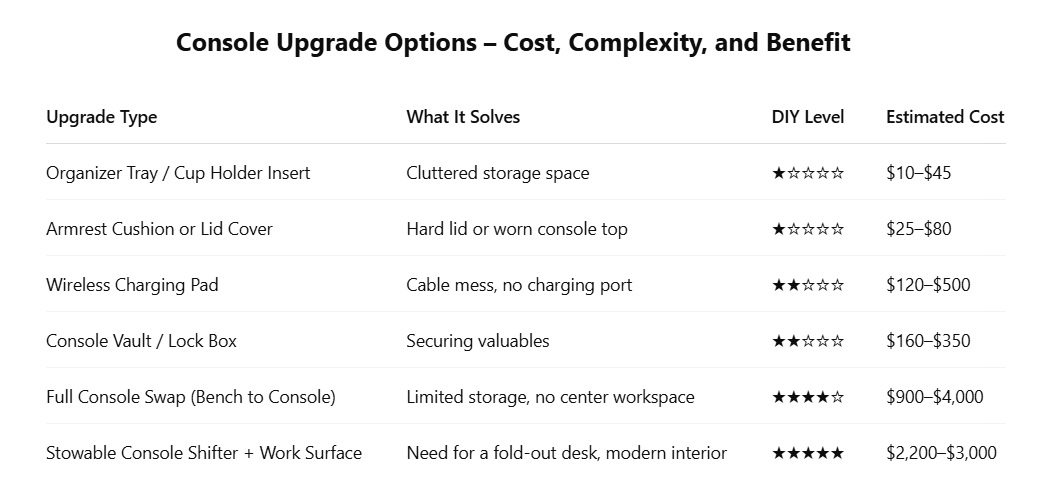
Not every F‑150 owner wants to rip out the entire center console. Some just want to stop their coffee from sloshing around. Others want to go full luxury with locking vaults and wireless charging pads. Whether you’re working with a $30 budget or $3,000, there’s a path for every goal.
Organizer Trays: Taming the Clutter
If your console feels more like a junk drawer than a storage space, this is the quickest win. Drop-in trays are designed to sit snugly within your existing console bin.
They don’t require tools, they don’t move around, and they separate your keys from your gum from your charger. For under $40, you go from chaos to clean in less than a minute.
Armrest Cushions: Small Upgrade, Big Comfort
Sometimes, it’s not about storage at all. If the factory armrest feels like resting your elbow on a brick, a padded cover changes everything.
Leather and neoprene options not only make long drives easier on your arm, but they can also cover up wear, add pockets, or match your interior better than the hard plastic lid that came from the factory.
Wireless Charging: Clean Dash, Charged Phone
You’ve got your phone cable plugged into the 12V outlet, which is looped around your shifter and jammed under the lid. If that sounds familiar, a Qi pad might be worth your money.
Aftermarket wireless chargers designed for the F‑150 usually fit right into the tray area and pull power from the 12V outlet beneath. Some come pre-wired and ready to drop in.
Others—especially OEM-style upgrades—require popping off trim panels and routing a new harness, but the reward is a clutter-free charging setup that works every time you set your phone down.
Console Vaults: Lock It Down
If you keep valuables in your truck, a console vault isn’t overkill—it’s peace of mind. These steel lockboxes are custom-fit to your console bin, often using factory mounting holes.
You still get your usual tray or divider on top, but beneath it is a key- or combo-locked compartment no thief will open quickly. Whether you’re carrying a firearm, expensive tools, or just don’t want your registration stolen, it’s a solid investment.
Full Console Swaps: From Basic to Premium
Here’s where the big transformation begins. If you’re working with a bench seat and a flip-down armrest, and you want a full-length center console with built-in storage, shifter, and tech ports, you’re looking at a full swap.
This isn’t just replacing one piece—you’re removing the center seat, installing a different carpet section or trim filler, and likely dealing with wiring for power ports, HVAC ducts, and maybe even seat sensors.
The price range varies wildly depending on whether you buy used OEM parts or go all-in on a brand-new setup, but you should expect to spend between $900 and $4,000 when all parts and labor are factored in.
Stowable Shifter Upgrades: Desk Meets Driver’s Seat
Ford introduced the stowable floor shifter and work surface in newer F‑150s to give owners a flat desk space between the seats. If you want this feature in your 2021–2024 truck and don’t already have it, the upgrade is technically possible—but it’s not simple.
You’ll need the entire console shell, the retractable shifter mechanism, and a dealer reprogram to make the electronics work. But if you regularly use your truck as a mobile office, this mod could completely change how you use your cab.
3. Small Add-Ons That Clean Up Your Console Fast
You don’t have to spend thousands to make your F‑150’s center console more usable. Sometimes, a few well-placed inserts or covers can make the daily experience far more enjoyable, without tearing anything apart.
Drop-In Trays: Quick Fix for Everyday Chaos
Drop-in organizers are one of the most popular console upgrades for a reason. They’re shaped to match your model year’s console and usually slot right into the bin without any hardware.
ABS plastic or felt-lined versions are both common, with cutouts for coins, pens, sunglasses, and chargers. No tools, no drama—just better storage within five minutes of unboxing.
Cup Holder Inserts and Expanders
If your coffee cup rattles around or your water bottle doesn’t fit at all, the stock holders probably weren’t designed with your gear in mind. Cup holder inserts—often 3D printed or rubberized—can be customized for exact fitment based on generation. Some even include extra slots for pens, gum packs, or a phone wedge.
Armrest Covers That Add Comfort and Storage
Replacing or covering your armrest can be as simple as stretching a neoprene or leather sleeve over the factory lid. Some models go a step further by adding MOLLE webbing, zippered compartments, or extra padding. These upgrades don’t just make the cabin feel better—they also hide wear and tear, especially in work trucks that see heavy use.
What Makes These Worth It?
They’re cheap, reversible, and take minutes to install. If you ever trade in your truck, you can remove them without leaving a trace. The only real limitation is that they don’t add more space—just help you make better use of what’s already there.
4. Bringing Your Tech Up to Speed
If your F‑150’s console still has just a 12V socket and a nest of charging cables, it might be time to modernize. Whether you’re tired of slow charging or just want a cleaner look, a few smart upgrades can make a big difference.
Wireless Charging Pads: Cut the Cord, Literally
Wireless Qi chargers have become a must-have, and the good news is that your F‑150 can easily catch up. Aftermarket pads typically sit beneath a rubber tray insert—just pop out the old mat, plug into your 12V or USB port, and drop your phone in. Some versions include LED status lights and thermal sensors to prevent overheating.
OEM-style upgrades are also available if you want that clean, factory-integrated finish. These often require removing the console lid or armrest to install a built-in charger plate. It’s a bit more work but worth it if you want seamless aesthetics and fewer moving parts.
One word of caution: if you use a magnetic case or a thick metal-backed holder, wireless charging may be inconsistent. In those cases, stick with wired fast-charging ports instead.
Adding USB-C and 110V Power Outlets
Many newer F‑150s include rear USB ports and a household-style outlet—but not all trims do. If your truck didn’t come with these, add-on kits are widely available. Some tap into existing wiring harnesses under the console, while others use a fuse-tap to safely draw power.
You can also find modules that mount cleanly into existing console panels, giving you both USB-A and USB-C for modern devices. Some kits even include voltage displays or fast-charge support.
These upgrades are especially useful if you regularly charge tablets, laptops, or power tools. And once you install them, you’ll wonder how you ever got by without them.
5. Lock It Down – Secure Storage That Means Business
If you ever leave valuables in your F‑150—tools, cash, firearms, or sensitive documents—your center console can be more than just a catch-all bin. With the right upgrade, it becomes a secure vault.
Console Vaults: Hidden Strength Beneath the Lid
Console vaults are metal lockboxes designed to drop into your existing center console cavity. They’re built from heavy-gauge steel and often feature pry-resistant lids, tamper-proof hinges, and key or combination locks. Some even offer RFID access or electronic keypads for faster entry.
These vaults typically install using your factory console mounting points, meaning no drilling. Remove a couple of screws, drop the unit in place, and re-tighten. Done.
Ford-endorsed brands like Console Vault and aftermarket favorites like RedRock have models to fit most 2009–2025 F‑150 consoles, whether you’ve got a flow-through or a jump-seat setup.
What to Watch For
The biggest thing to double-check is fitment. Some vaults only cover half the console, leaving the rear tray accessible. Others are full-depth units that replace the entire internal bin, which can affect access to USB ports or make it harder to stash quick-grab items like a phone or wallet.
Also, keep in mind that installing a large vault may slightly reduce usable space for everyday items. It’s a trade-off—less convenience, more peace of mind.
If you carry valuables regularly or park in high-theft areas, this upgrade quickly pays for itself in confidence alone.
6. Taking the Leap – Full Console and Seat Swaps for a Total Cabin Overhaul
Sometimes a small upgrade just doesn’t cut it. If you’re after a true transformation—more storage, a sleeker layout, or a modern work surface—then it might be time to ditch the jump seat and go all-in with a full console conversion.
Swapping the Bench for Buckets – What It Really Involves
Moving from a 40/20/40 bench seat to individual bucket seats with a center console isn’t as simple as dropping in new parts. It requires a full swap: both front seats, the console, seat belts, possibly a new carpet trim section, and often new HVAC ducts for rear airflow.
Depending on the generation, you may need to drill M10 or M12 holes into the floor pan to mount the bucket seats securely—something commonly done in 12th-gen trucks. That’s not a casual Sunday DIY project. If you’re not comfortable with structural mods, this is one to hand off to a custom shop.
And don’t forget the airbags. Modern F‑150s have seat occupancy sensors and side airbags integrated into the seats. You’ll need to either transfer those systems or ensure the new seats are fully compatible, or you risk throwing airbag faults—or worse, disabling them altogether.
The Stowable Shifter – From Utility to Mobile Office
In 2021, Ford introduced a stowable gear shifter in higher trims—a neat trick that lets the shifter fold down flat to reveal a work surface.
Upgrading to this setup involves more than just a new console shell. You’ll need the entire shifter assembly, the associated BCM wiring harness, and dealer programming to get it talking to your truck’s computer.
Some owners also report needing to swap out their steering column trim to delete the original shifter mount cleanly.
This upgrade looks slick and adds legit utility, but it’s not plug-and-play. Expect wiring work, trim disassembly, and a software flash using tools like FDRS or IDS.
Mixing Generations? Here’s the Catch
Thinking of pulling a console from a newer F‑150 and fitting it into your older one? Be careful. Even within the same generation, console mounting points, wiring connections, and trim cutouts can vary.
Trying to fit a 14th-gen console into a 13th-gen truck often leads to headaches—offset mounts, mismatched carpet lines, and incompatible CAN signals.
Some brave souls make it work using custom brackets and CAN-bridge modules, but you’d better be handy with wiring and patient with troubleshooting.
If your goal is a clean fit that won’t require a dozen workarounds, stay within your truck’s generation—or stick to proven swap kits shared on F‑150 forums.

7. Crunching the Numbers – What It Really Costs to Upgrade Your F‑150 Console
Before grabbing parts or booking an installer, it’s worth stepping back and figuring out what your upgrade is going to cost. Whether you’re adding a $10 organizer or doing a full console swap with dealer reprogramming, the price range is all over the place.
Budget Mods That Make a Difference
Not every upgrade needs to break the bank. Simple drop-in trays, felt-lined organizers, or an armrest cover can come in under $50. These are usually vehicle-specific, install in seconds, and instantly declutter your storage space or make long drives more comfortable.
If you’re going the DIY route, these are the low-hanging fruit. No tools. No trim removal. No sweat.
Tech and Security Upgrades That Creep Up the Cost
Now, step into the mid-tier zone: wireless charging pads, console vaults, and USB-C harnesses. Aftermarket Qi pads start around $120 and can hit $500 for higher-end, OEM-style kits with integrated LED indicators and passthrough power.
Lock boxes or console safes usually fall between $160 and $350, depending on whether you go half-box or full-size and what kind of locking system it uses (RFID, barrel key, combo, etc.). These often require minimal tools but need proper fitment to avoid interfering with existing USB ports or tray space.
Full Console Swaps—Where the Real Money Goes
This is where things scale fast. A full bench-to-console conversion with bucket seats can easily range from $900 to $4,000 depending on the parts source, condition (new vs. salvage), and any needed trim panels, ducts, or wiring extensions.
Adding a stowable gear shifter or work surface pushes the price up even more—think $2,200 to $3,000, especially if dealer programming is needed. And that’s before you add labor if you’re not handling the install yourself.
The Hidden Extras That Sneak Into Your Budget
There’s more to the bill than just the parts. Swapping consoles often means replacing or modifying floor carpet, adding steering column shrouds to cover old shifter mounts, and picking up new trim to bridge any panel gaps.
Then there’s dealer fees. Some upgrades—especially those involving shifter modules or lighting—require BCM or PCM reprogramming. That’s not free. And if you’re not doing the work yourself, expect to pay a shop anywhere from $300 to over $1,000 in labor depending on the complexity.

8. Making the Call – Should You Install It Yourself or Call a Pro?
Upgrading the center console on your F-150 can look easy on paper—but once you pop the lid off and stare down into a web of trim clips, wiring, and unexpected fasteners, things get real. Whether you should tackle it yourself comes down to four critical questions.
Can You Handle It with Just Hand Tools?
If your upgrade involves a drop-in tray, armrest cover, or even a bolt-in lockbox, you’re golden. Most of these use no tools or just a Phillips screwdriver.
But when it comes to removing trim panels, lifting the existing console, or drilling mounts into the floor, you’ll need a bit more than a basic socket set. If the instructions mention “pry tool” or “torx bit,” take a moment to reassess.
Will You Be Messing with Wires or Fuses?
Tech upgrades—especially wireless chargers or rear USB ports—usually tap into your truck’s 12V outlet or factory harness. That means you’ll be running wires, removing side panels, or tapping into a fuse box. If you’re not confident tracing a wiring diagram or knowing which circuit needs protection, that’s a red flag for DIY.
Are You Comfortable Drilling into the Floor?
A bench-to-bucket seat conversion or full console swap might require new bolt holes, especially in 12th-gen F-150s. If you’re working near a fuel line or airbag wiring, drilling gets risky fast. Even tapping new threads into a seat rail can be a deal-breaker if you don’t have the right tools or experience.
Do You Want to Risk a Dealer Flash?
Some high-end swaps, like adding a stowable floor shifter, require flashing your truck’s Body Control Module (BCM) or Powertrain Control Module (PCM). You’ll need Ford’s IDS or FDRS software—and access to a dealer or certified tech to get it done right. If that’s not in your wheelhouse, professional help is the safer (and often cheaper) choice.
9. Real-World Feedback – What F‑150 Owners Are Saying
Before pulling the trigger on a center console upgrade, it helps to hear from those who’ve been there—people who’ve done the swap, hit snags, and found creative fixes. Online forums, Reddit threads, and YouTube comments are full of brutally honest takes from the F‑150 community.
Win-Win Upgrades That Actually Deliver
Owners consistently rave about how much better their truck feels after a center console upgrade—especially when going from a basic jump seat to a full console.
More storage, better aesthetics, cleaner tech integration. One 2022 XL owner even described the upgrade to a Lariat-style console as “the best interior change I’ve made to the truck—hands down.”
Another common success story? Drop-in trays and lockboxes. They’re cheap, fast, and instantly useful. You’ll find dozens of posts from people who finally stopped their phone, pens, and change from sliding around every time they made a turn.
Annoying Surprises You’ll Want to Avoid
Not every story has a happy ending. Several F‑150 owners ran into console doors that felt too loose or wobbly. One popular fix involves wedging a coin or washer inside the spring hinge to increase tension—cheap, but a fix nonetheless.
Cross-generation swaps can be tricky too. There are plenty of reports of 2018 consoles not lining up in newer 2023 models. Even if the bolt pattern fits, mismatched wiring or incompatible USB hubs can derail the whole upgrade unless you’re prepared to start modifying or replacing connectors.
Tips from the Community That Actually Help
In the sea of upgrade advice, a few golden nuggets stand out:
• Salvage yards are your best bet for OEM consoles if you’re on a budget.
• Always grab matching trim pieces when pulling a console—you’ll regret it if you don’t.
• Don’t trust “universal fit” labels. If it doesn’t list your exact model year and trim, double-check dimensions and mounting specs.
Some owners even create DIY build threads or post videos showing every step of their swap. If you’re tackling something complicated—like a floor shifter retrofit—these walkthroughs can be more useful than any instruction sheet.
10. When It’s Best to Let a Pro Handle It
A center console upgrade can be a satisfying DIY project—until it isn’t. While many F‑150 mods are straightforward, some situations call for a skilled hand and the right equipment. Here’s when it’s smarter (and safer) to let a professional take over.
Airbags and Seat Sensors Aren’t Worth the Risk
If your upgrade involves removing or replacing seats, you’re probably dealing with seatbelt pre-tensioners, occupancy sensors, and possibly side airbags. Mistakes here don’t just trigger warning lights—they can disable your airbag system or create a real safety hazard.
That’s why many shops recommend leaving any seat-related swap, like going from a 40/20/40 bench to full buckets and console, to professionals familiar with Ford’s wiring and safety modules.
When the Truck Needs to Talk to the Console
Swapping in a stowable floor shifter or modern USB-C hub might seem like just a plug-and-play, but many newer features require programming the truck’s computers.
If your upgrade involves the BCM (Body Control Module) or IPMA (Integrated Processor Module A), dealer-level software like Ford’s IDS or FDRS is often required.
Owners attempting DIY retrofits without access to this gear usually end up towing their trucks to the dealer anyway—except now they’ve got a half-installed console and no power to the shifter.
Drilling Through the Floor? Think Twice
Drilling into the cab floor to mount a new console bracket or relocate seats sounds simple—until you hit something you shouldn’t. Fuel lines, wiring harnesses, and structural channels run underneath. A mistake here can be expensive or dangerous.
If your upgrade requires drilling, welding, or modifying the seat rails, professional installation with a lift and proper schematics is the safer call.
Protecting Your Warranty and Trade-in Value
Even if everything’s done right, a poorly documented upgrade can be flagged as a modification that voids portions of your warranty—especially if it involves electronics or safety systems.
Dealers typically won’t touch a modded console if something goes wrong down the road unless you’ve had it professionally installed and documented.
If you’re planning to trade or sell your truck, that paper trail can also help preserve value.
Wrapping It Up: What Matters Most in Your F‑150 Console Upgrade
A center console upgrade can completely change how your F‑150 feels inside—whether you’re chasing better storage, cleaner tech, or just a more refined look. But the best upgrade is the one that fits your truck’s generation, works with your layout, and matches your skill level (or your install budget).
Stick with year-specific parts to avoid headaches. Don’t underestimate what’s involved when wiring, drilling, or flashing modules comes into play. For simple upgrades like trays or wireless chargers, DIY is fair game. For anything tied to airbags, shifters, or body computers—call in a pro.
And above all, learn from owners who’ve done it already. Forums, video walkthroughs, and firsthand reviews are where the real insights live.
A well-executed upgrade isn’t just about making things look good—it should make your daily drive smoother, more functional, and easier to enjoy.