
When it comes to automotive paint jobs, the starting point is crucial for achieving a flawless finish.
Applying high-build primer over an epoxy primer is a common practice and an essential step for vehicles that require a long-lasting and smooth surface.
Don’t skip this step if you want your automotive project to have a durable and flawless finish.
Why Use High-Build Primer Over Epoxy Primer?
Epoxy primer offers excellent adhesion and corrosion resistance, acting as the perfect base coat for your vehicle’s body. However, high-build primer is indispensable for surfaces requiring more extensive leveling and a smoother finish.
This thicker primer fills any minor scratches, dents, or imperfections, which is crucial for achieving a flawless finish that automotive enthusiasts strive for.

✔ Durable, Rust-Resistant Finish – Designed to go directly over bare steel, aluminum, body filler, or fiberglass, this 2K epoxy primer lays down a tough, corrosion-blocking base that sets the stage for long-lasting paintwork.
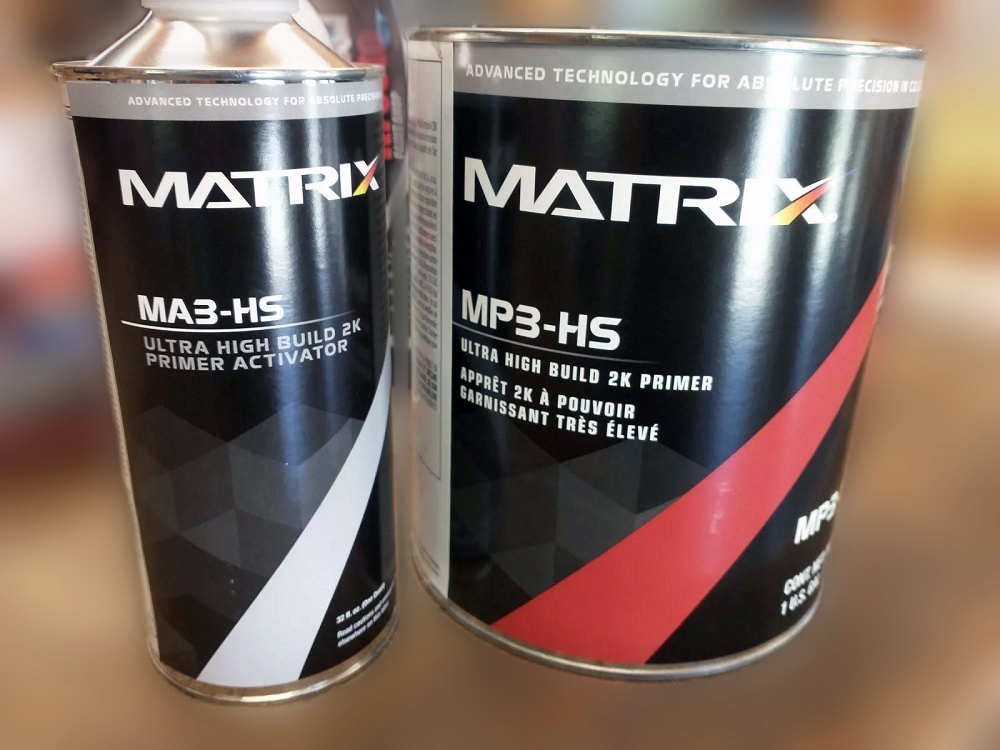
✔ No HVLP Needed – Get professional spray results without a gun. The German-made nozzle delivers a smooth, wide fan pattern, mimicking pro paint equipment.
✔ Built-In 2K Catalyst – Features an internal hardener system for enhanced adhesion and chemical resistance. Activates with a simple button press, offering up to 48 hours of pot life once triggered.
✔ Coverage & Shelf Life – Each 12 oz can covers up to 16 square feet, with an impressive 3-year shelf life unopened.
✔ Trusted by Pros – Backed by Eastwood’s reputation for high-performance restoration tools, with lifetime tech support and a 60-day limited warranty.
The Importance of High-Build Primer for a Superior Finish
Using a high-build primer over epoxy is about aesthetics, protection, and longevity. This approach ensures the vehicle’s body is visually appealing and shielded against various elements.
Whether it’s minor imperfections in the bodywork or ensuring a high-quality base for the final paint coats, the dual-layer primer approach lays the groundwork for superior results.

✔ Preps Metal for Paint – Gently etches bare metal and neutralizes rust while laying down a zinc phosphate layer for unbeatable coating adhesion.
✔ Boosts Coating Performance – Ensures strong chemical bonding with POR-15 Rust Preventive Coating or any paint applied afterward.
✔ Safe, Water-Based Formula – Non-toxic, non-corrosive, and easy to apply by brush, spray, roller, or dip.
✔ Ideal for DIY & Pro Projects – Use on auto parts, outdoor fixtures, fencing, and more to stop rust before it spreads.
1. Preparation of Epoxy-Coated Surface
Before you can begin applying the high-build primer, the condition of the epoxy-coated surface plays a critical role in how well the following layers will adhere and perform. Proper preparation is necessary to ensure the high-build primer can do its job effectively.
Surface Cleaning
Before anything else, you need to clean the epoxy-coated surface thoroughly. Any remaining dust, grease, or oil can prevent the high-build primer from adhering correctly.
Using a wax and grease remover is recommended to eliminate all contaminants. This step ensures the primer will bond well with the surface without any issues.
Surface Inspection
Once the surface is clean, a detailed inspection is necessary. Look for imperfections, such as minor scratches, pinholes, or uneven areas.
A high-build primer is excellent at filling these types of minor flaws, but identifying them first ensures that you apply the primer where it’s most needed. This attention to detail will help achieve a smooth, flawless finish.
2. Application of High-Build Primer
Applying high-build primer correctly is essential to achieving the best possible foundation for your paint job. Below are the steps to mix and apply this primer properly.
Mixing Primer
The high-build primer must be prepared according to the manufacturer’s instructions. This often involves mixing in a catalyst or hardener, which helps the primer to cure and harden properly. Ensuring the correct ratio and thorough mixing are vital to the performance of the primer once applied.
Spraying Technique
A spray gun with a 1.8 to 2.2 mm tip is typically ideal for the application. Adjust the spray gun to the manufacturer’s specified settings for the best results.
The technique is also essential—hold the spray gun about 6-8 inches from the surface and apply the primer in even, overlapping strokes. This method ensures uniform coverage and helps prevent missed spots or uneven thickness.
Number of Coats
It is usually recommended that at least two to three high-build primer coats be applied. Follow the primer manufacturer’s guidelines for adequate flash-off time between each coat.
This ensures proper thickness and leveling and aids the overall curing process, setting the stage for a durable finish.
3. Curing and Post-Application
After applying the high-build primer, the following steps involve curing and preparing the surface for the final paint application. Proper curing and sanding are essential for achieving a high-quality finish.
Drying Time
It would be best to allow the high-build primer to dry according to the manufacturer’s recommendations. The drying time can vary significantly depending on the specific product and environmental conditions, ranging from a few hours to overnight.
Ensuring that the primer is fully dry before proceeding with sanding is crucial for the integrity of the paint job.
Sanding
Once the primer is fully cured, you need to sand it with fine-grit sandpaper (such as 320 or 400-grit). This step is not just about smoothing; it’s also about creating the perfect base for the paint to adhere to.
A well-sanded primer surface ensures that the final coats of paint apply evenly and bond properly, resulting in a visually stunning and long-lasting finish.
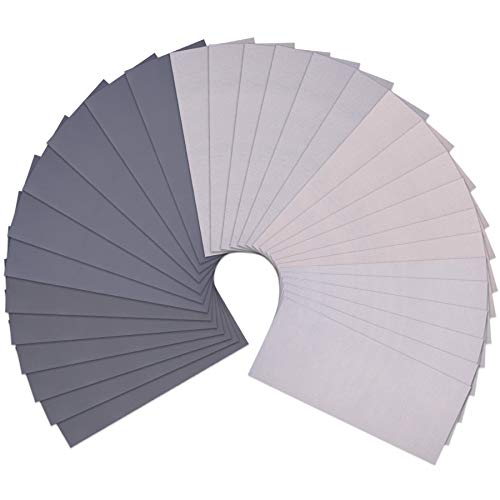
✔ Comprehensive Grit Selection – Includes 30 sheets with 5 high grits: 2000, 3000, 5000, 7000, and 10000, giving you the range needed for ultra-fine polishing and finishing.
✔ Generous Size and Flexible Use – Each sheet measures 9" x 3.6", easy to use by hand, with a sanding block, or cut down to fit specific project needs.
✔ Wet or Dry Application – Crafted from high-quality silicon carbide with nano-sand-planting technology, ideal for use with water, oils, varnish, shellac, or lacquer.
✔ Durable and Smooth Handling – Features a soft, electroplated backing for easy sanding without cracking, tearing, or losing grit.
✔ Versatile Polishing Set – Perfect for fine finishing on metal, wood, plastic, stone, jade, leather, and automotive projects.
4. Additional Tips
When applying primer, especially in environments where you strive for perfection in automotive painting, it is crucial to consider the temperature and humidity.
Applying high-build primer in a controlled environment is required. The temperature and humidity need to be within the range the primer manufacturer recommends to avoid common issues like blushing or improper curing.
Maintaining these conditions helps ensure that the primer cures evenly and achieves the desired mechanical and aesthetic properties.
Conclusion
Applying high-build primer over an epoxy primer is essential for achieving a flawless finish in automotive painting. By thoroughly preparing the surface, carefully mixing and applying the primer, and allowing adequate time for curing, you ensure a superior base for the final paint layers.
Remember to control environmental factors like temperature and humidity to prevent application issues. Once you’ve mastered these steps, you’ll be well on your way to enhancing the appearance and durability of your automotive paint job.