
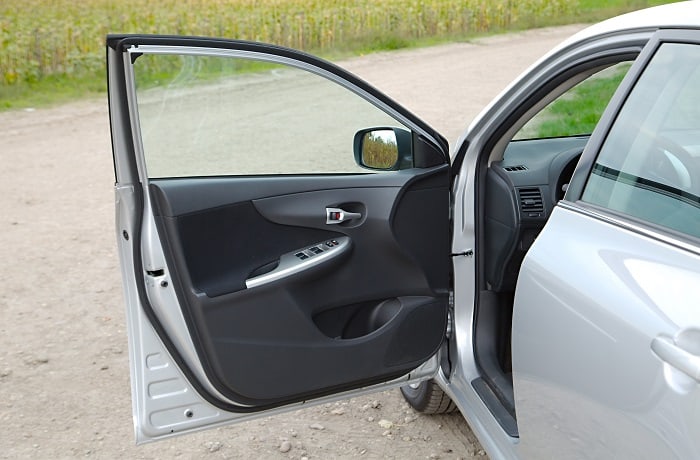
The door jamb is an area in cars that are often overlooked. It is the part that connects the door to the vehicle’s body.
Though often ignored, door jambs play a critical role in a vehicle. They facilitate the ease of opening and closing the door. The door jambs also house vital accessories such as strikers, hinged, and guides containing vehicle details.
Like other car parts, the door jambs are also an excellent candidate for plasti dip. Yes, you can spray plasti dip on door jambs, and it would hold up well if you applied it correctly.
Spraying Plasti Dip on door jambs is easy, and you don’t need any professional tools or equipment.
Why Should I Plasti Dip Door Jambs?
There are many reasons why you should spray Plasti Dip on door jambs. These reasons include;
• Plasti dip can restore the finish of faded paint on the door jambs.
Since door jambs are often ignored, the paint job in these areas is bound to wear out sooner. As a result, you can find the paint in these areas faded. With plasti dip, you get to enhance the aesthetics of the door jambs.
Let no one mislead you that door jambs aren’t visible. Whenever you are boarding a car, the second thing you see is the door jambs. If the paint there is faded, you can use plasti as a quick correction method.
• Secondly, plasti dip can help you match the color of door jambs to a new paint job.
Whether you were the one painting your car or hired someone to do it, there is a good chance that they may forget to spray on the door jambs.
It’s a common mistake. Plasti dip can, however, correct that mistake because you can spray a color that matches the one on the car.
• You should also know that plasti dip does a great job preserving the finish of the paint on the door jambs.
Besides correcting faded paint, plasti dip can prevent it from fading.
• You can also spray plasti dip on door jambs if you want to customize the look of your car.
Will Plasti Dip Hold Up on Door Jambs?
Door jambs can be plasti-dipped. We have already clarified that and listed some of the benefits of engaging in such a project. The big question is – will it hold up?
Plasti dip should hold up pretty fine. However, considering that door jambs are located alongside high-traffic areas, the plasti dip can easily be scratched or peeled off when passengers are entering the car or when you are loading cargo.
Let’s assume the door jambs of your driver and passenger doors have been plasti-dipped. As the one doing that project, you may be a bit cautious when stepping inside the car.
Your passengers, however, may not be equipped with this information. Therefore, they may rub their shoes against the door jambs, and that would immediately scratch or peel the plasti dip.
But this doesn’t have to be a cause for concern. If the plasti dip on your door jambs is accidentally peeled off or scratched, you can easily touch it up with more plasti dip spray.
This is one of the perks of plasti dip. It’s effortless to fix any peels or scratches on it. Just clean the surface and spray plasti dip on top.
Is It Easy to Match Door Jambs with the Entire Car Using Plasti Dip?
We have already mentioned that matching the color of door jambs to that of the entire car is one of the reasons why people spray plasti dip. However, you need to understand that plasti dip isn’t paint.
Even though it is available in a wide range of colors these days, it’s not easy to get an exact match of plasti dip to your car’s paint job.
If your car is black, it would blend better with a black plasti dip spray. But there are different shades of paint, such as metallic black. When you use black plasti dip on the door jambs, very keen people can spot the difference.
It is much easier to match door jambs with the entire car by painting them instead of plasti dip. With paint, you can check the car’s VIN and spray the exact shade. But with plasti dip, you have to go with whatever you can get your hands on.

✔ All-Weather Protection – Shields surfaces from moisture, acids, corrosion, vibration, and heat, while remaining flexible and durable in extreme conditions.
✔ Non-Slip Grip & Comfort – Adds a soft-touch, non-slip coating ideal for tools, handles, car parts, and more—improves both comfort and control.
✔ Peelable & Removable – Easily removes without damage when you're ready to restore the original surface—great for temporary coatings or customization.
✔ Sound & Shock Dampening – Helps reduce noise, electrical shock risk, and minor vibrations, making it ideal for DIY automotive and workshop use.
✔ Versatile Use Cases – Perfect for wheels, badges, tools, and trim, or for protecting electronics, metal, glass, rubber, and more.
How to Plasti Dip Door Jambs?
The process of plasti dipping door jambs is the same as the one you would use on any part of your car. Here is a quick guide for those who have never sprayed plasti dip on their cars.
Step 1 – Gather the Essential Supplies
Unlike painting, plasti dip doesn’t need plenty of supplies. All you require are several cans of plasti dip. You can also get one can if the area you are working on is small.
Step 2 – Clean and Dry the Door Jambs
Because of their location, door jambs can easily be forgotten when one is cleaning their car. Therefore, they tend to accumulate a lot of dirt. You will need to dedicate some time to give this part of the vehicle a thorough wash.
Grab some water and car shampoo. It’s advisable to get a soft brush to help you clean hard-to-reach areas. Wash until the door jambs are clean. It would be best never to spray plasti dip on a dirty surface.
Doing that results in the trapping of contaminants. Clean and dry the surface with a clean microfiber cloth.
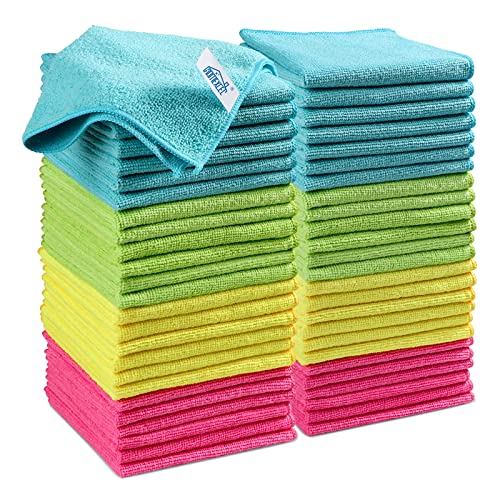
✔ Streak-Free & Scratch-Free Cleaning – Soft microfiber blend (87% polyester, 13% polyamide) lifts dirt and grime without leaving behind lint or damaging delicate surfaces.
✔ Ultra Absorbent & Quick Drying – Ideal for wiping spills, drying dishes, polishing cars, or cleaning screens—soaks up liquids fast with minimal effort.
✔ Durable & Reusable – Reinforced edges help these cloths withstand hundreds of wash cycles, making them a cost-effective, eco-friendly alternative to paper towels.
✔ Versatile 4-Color System – Color-coded (Green, Blue, Yellow, Pink) to help prevent cross-contamination across cleaning tasks (e.g., kitchen, bathroom, auto, electronics).
✔ Perfect Size for Any Job – Each 11.5" x 11.5" cloth is compact yet effective for everyday cleaning or detailing work—great for home, office, or garage use.
Step 3 – Cover Surrounding Areas with Masking Tape and Newspaper
Dealing with plasti dip overspray is easy because all you have to do is peel it out. However, there is usually no need for such when you apply some masking tape and newspaper to the surrounding parts.
Since you will be working with the doors open, ensure that the upholstery and piece of rubber next to the doors are taped. This will ensure that the plasti dip is very easy to remove when you are done spraying it on.
Please note that plasti dipping door jambs is a bit tricky because of where this part of the car is located. You need to be careful so that you can avoid plasti dip overspray.
Step 4 – Find a Suitable Working Area
The best place to spray plasti dip is outdoors in a garage. Even though outdoors you will have access to fresh air, there is a higher probability of paint overspray caused by strong winds.
Doing everything in an enclosed environment allows you to spray plasti dip on the intended surface. If you are spraying plasti dip in a garage, please wear a mask. That will keep you safe.
Step 5 – Spray Away
Shake your can of plasti dip and spray away. Hold the can at least six inches away from the door jambs. Covering surrounding areas ensures that plasti dip overspray doesn’t stick on the seats or windows.
It makes spraying much easier. You will need to spray at least three coats. The first coat is to promote adhesion. The other two are to give you a better finish.
Remember, the thicker the plasti dip, the easier it is to remove. When you are done, remove the tape and give it at least 4 hours to cure. Give it more time if the temperatures are low. Avoid touching the plasti-dipped surface until it cures.
Will Plasti Dip Protect Paint on Door Jambs from Contaminants?
Plasti Dip is a specialized rubber coating that creates a protective barrier over paint. It is gentle on paint, and when you finally get tired of it, all you have to do is peel it off.
When you layer your door jambs with plasti dip, they will be protected from everything, including dirt, road salt, snow, and any other contaminant you think will damage the finish on the door jambs.
If your goal is to protect the paint on door jambs, plasti dip can be of significant help.
How Can I Remove Plasti Dip Overspray on Door Jambs?
At times, it could be the other way around. You may be painting the car door and accidentally got some plasti dip overspray on the door jambs.
That could have been avoided by covering it with masking tape. But if it has already happened, here are quick solutions to help you out.
• The best way to remove plasti dip is by peeling it off. Thick layers of plasti dip are easier to remove than thin layers. It’s up to you to evaluate the thickness or thinness of the plasti dip overspray on your door jambs.
• If the plasti dip overspray is thin, you can spray some WD40 and rub it with a microfiber cloth. That should quickly get rid of overspray.
• If some of the plasti dip proves too stubborn to peel off, you will need a stronger cleaner such as rubbing alcohol. Dab some on a cloth and then rub it on the plasti dip. That should deal with it right away. After using a strong solvent, always remember to clean it with water and soap.