
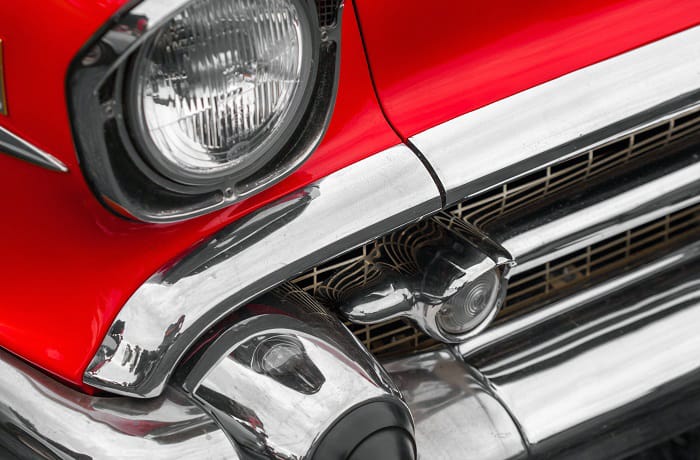
After a while, it is normal for you to get bored with shiny chrome bumpers. Or, you may have seen some rust on it. Other than the above, there are many reasons why you may want to blackout chrome bumpers.
For instance, you may be interested in getting a color that blends with that of your paint. Irrespective of your reasons, you need to use the right method. And that is what we are going to discuss today.
There are several ways you can blackout chrome bumpers. These methods include;
1. Spraying Black Paint
This is the most commonly used method. Painting chrome bumpers is an excellent way for you to change the appearance of the bumpers.
And unlike other methods that we may list below, paint holds up pretty well, it looks amazing, and here is the best part – you don’t have to pay anyone to do it for you.
When spraying black paint on the chrome bumpers, the first step is to de-attach the bumper from the vehicle. This will ensure you don’t get paint overspray on other parts of your car.
Plus, you will be able to spray every surface of the bumper. Removing a bumper shouldn’t be difficult as it is often attached to bolts and screws.
The next step is to wash it thoroughly. Any presence of dirt or contaminants can affect the paint’s ability to hold onto the surface. Dry it and look for rust spots. If there are any, a solution of baking soda and vinegar should remove them right away.
After removing rust spots, you should sand the surface of the chrome bumpers with 60-grit sandpaper. To get a finer finish, sand it off with 320-grit sandpaper.
The role of using sandpaper on chrome bumpers is to remove the shiny stuff. The smoothness of chrome makes it hard for paint to hold on to it.
However, when you sand it, you get many scratches that act as the ideal surface for chrome to hold on to. Once your surface is rough and ready, wipe it with a wax remover. This gets rid of any remnants on the surface.
Get your hands on some self-etching primer and apply at least two coats on the chrome bumper. It dries very fast, therefore, give each coat two minutes to dry.
The final coat should be given at least 4 hours to dry. This should be followed by a regular primer. And then you can sand the primer after it has dried. You must sand only the primer.
Ensure you don’t reach the surface beneath, which is the chrome in this case. Should you do, so, re-apply the primer once more. The sanded primer should be cleaned with a cloth with lacquer thinner or water.
The prep work is usually the difficult part of blacking out chrome bumpers with the paint. Using a spray gun, apply three coats of your black paint.
Ensure that you create some time in between coats. This should be followed by a layer of clear and your bumper will be fully blacked out. The clear enhances the aesthetics of your blacked-out chrome bumper and it also protects it from the elements.

✔ Durable Wheel Refinishing – Designed for metal wheels, plastic hubcaps, and more, delivering a tough, long-lasting coat.
✔ Fast-Drying, Oil-Based Formula – Dries to the touch in just 10 minutes and covers up to 8 sq. ft. per can, ideal for quick DIY projects.
✔ Scratch & Dent Resistant – Built to withstand road wear, chips, and abrasion, maintaining a clean, freshly painted look.
✔ Glossy Graphite Finish – Adds a sleek, high-shine finish that enhances curb appeal and mimics OEM-style wheel coatings.
✔ Easy Spray Application – Provides even coverage with minimal prep, perfect for wheel touch-ups or full resprays.
2. Plasti Dip
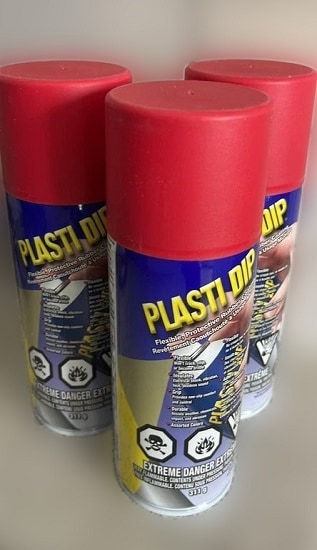
Does the painting look like a lot of work? Do you prefer a method that takes less time? Plasti dip should be the next thing to consider.
Ever since plasti dip was introduced in the market, it has been welcomed with open arms in the auto industry. Some people even plasti dip their entire cars.
If you want to blackout your chrome bumpers, plasti dip can get the job done in minutes. After painting, it is the second most popular method you can blackout chrome bumpers.
One of the areas that plasti dip outshines painting is that it is very easy to remove. So, if you get it wrong. Unlike painting where you have to spend hours removing the paint, plasti dip can just be peeled off easily.
Plasti dip dries into a rubberized texture that not only blacks out your chrome but also protects the bumper against impact, elements, and debris.
Depending on whether you are blacking out one or both the front and rear bumper, you will need to identify how many cans of plasti dip are needed.
Three to four cans should be enough to plasti dip both bumpers. Plasti dip should be applied away from direct sunlight, find a shade to carry out this project.
Thirdly, you can either unscrew the bumpers or mask the surrounding areas. We recommend unscrewing the bumpers as it will be easier to spray and there will be no risk of overspray.
The main advantage of plasti dip over painting is that there is no prep work needed.
The bumper just has to be clean and dry. Shake the can for about a minute and get to spraying. Hold the can at least 10 inches away from the bumper. Give 30 minutes in between coats.
The recommended number of coats is four to six. While we are still on the number of coats, what you need to know is that plasti dip is more durable when it is applied in thick coats.
Therefore, do not shy away from spraying several coats on your chrome bumpers. Having done that, take a step back and admire your new blacked-out chrome bumpers.

✔ All-Weather Protection – Shields surfaces from moisture, acids, corrosion, vibration, and heat, while remaining flexible and durable in extreme conditions.
✔ Non-Slip Grip & Comfort – Adds a soft-touch, non-slip coating ideal for tools, handles, car parts, and more—improves both comfort and control.
✔ Peelable & Removable – Easily removes without damage when you're ready to restore the original surface—great for temporary coatings or customization.
✔ Sound & Shock Dampening – Helps reduce noise, electrical shock risk, and minor vibrations, making it ideal for DIY automotive and workshop use.
✔ Versatile Use Cases – Perfect for wheels, badges, tools, and trim, or for protecting electronics, metal, glass, rubber, and more.
3. Spray-On Bedliner
Out of the above two options, the spray-on bedliner is the toughest and most durable. Should you decide to blackout your chrome bumper with a bedliner, ensure that you rough up the chrome with sandpaper or Scotch-Brite. The rougher the surface, the easier the bedliner will bond to the surface.
Unlike paint which can chip or peel off when exposed to a lot of abuse, a spray-on bedliner is very strong and resistant to UV rays, the elements, and anything else that may be thrown at it. The bedliner does not scratch easily and it looks great, more so if your truck is painted black.
Similar to the above methods on how to blackout chrome bumpers, to ensure the bedliner is applied all over the bumper, remove it from the vehicle.
And spray it when it’s on the ground. If you are the kind of person who prefers to spray the bumper when it is still attached to the car, mask tape the surrounding surfaces because bedliner overspray is very difficult to remove.

✔ DIY-Ready Protection – The original J-B Weld Herculiner lets you coat and protect truck beds, trailers, decks, walkways, and more—no spray gun needed.
✔ Tough, Skid-Resistant Finish – Dries to a thick, textured surface that’s 5x stronger than standard roll-on liners, preventing chips, flakes, or peeling.
✔ Built to Withstand It All – Bonds to metal, wood, concrete, rubber, fiberglass, PVC, and most plastics, offering protection against gasoline, oil, chemicals, and solvents.
✔ Rust-Blocking Seal – Creates a moisture-resistant barrier that helps prevent corrosion and rust in harsh conditions.
✔ Complete Kit Included – Comes with 1 gallon of black bed liner, 2 rollers, 1 handle, 1 brush, and 1 abrasive prep pad for a full DIY application.
✔ Fast Curing Time – Functional cure in 10–12 hours, with full curing in 24 hours, so you can get back to work fast.
4. Vinyl Wrap
Ever since vinyl wraps for vehicles came into existence, nowadays, if you don’t like it, just wrap it. You can wrap any part of your car, chrome bumpers included.
Other than being used for decoration purposes, vinyl wraps play a key role in protecting the chrome bumper from damage.
If you are tired of seeing the shiny chrome surface on your bumpers, you can always visit a body shop near you and have them wrap it for you.
Compared to a quality paint job, the price of vinyl wrapping a chrome bumper is almost the same. You, therefore, have to decide which option suits you best.
There are pros and cons of vinyl wrapping your car. Unlike all the above methods, you must take your car to an auto body shop for the bumper to be blacked out with wrap. Wrapping a car isn’t a DIY procedure, not unless you have some experience with such.
Secondly, vinyl wrap isn’t the best product to use on bumpers because they are quite vulnerable to damage and scratches.
When the wrap is scratched, the vinyl beneath will be visible. And unlike paint that can be touched up, you will have to return to the auto body shop.
Plasti Dip vs. Spray Paint Chrome Bumpers
From the above methods on how to blackout chrome bumpers, the two most popular methods are spray painting and plasti dipping.
If you have settled your mind on these two, here is a quick comparison. Plasti dip is easier to apply than spray paint. The latter requires a lot of prep work. With plasti-dip, you just have to grab the can and get to spraying.
In matters related to the final finish, spray paint looks better than plasti dip, more so when you add a layer of clear coat.
There is also the issue of plasti dip being more durable than paint which can be scratched easily or peeled off when applied incorrectly. Plasti dip also gives you the added benefit of allowing you to experiment with colors as it can be removed easily.
Vinyl wrap is way too delicate for a bumper, especially when you consider the level of abuse they are exposed to. Bedliner is another great choice. Though not as popular as the above two, it is durable and the rugged finish looks great.
Should You Blackout Chrome Bumpers or Hire a Professional to Do It?
A professional blackout job will always be better than one done by an inexperienced individual. If you however have the skills to blackout your chrome bumper using any of the above methods, feel free to give it a try.
Products such as plasti dip don’t need specialized skills. And you can do it yourself as long as you follow instructions.